
GLSL Tutorial – Texturing with Images
| Prev: Texture Coordinates | Next: Index |
Most of the time a texture is an image that we want to apply to a shape, more or less like wallpaper. Sometimes a texture can be seen as data, not colors. Texture coordinates provide the mapping between the image and our shape. To use textures inside our applications we have to perform some setup steps in OpenGL before we actually can use the texture in the shaders. In this section we shall cover some typical texture usage scenarios.
OpenGL
To use a texture inside a shader we first need to create an OpenGL texture object. A common scenario we also want to load an image from file to provide the data to the texture, see this page it you are not sure how to do this.
The shader setup requires a uniform to hold the texture unit. Note that the shader receives the texture unit, not the texture name. OpenGL provides multiple units so we can use more than one texture in a shader. The total number of available units is GL_MAX_COMBINED_TEXTURE_IMAGE_UNITS.
Lets assume that the shader declares a uniform named texUnit. Also assume that we only have one texture, which we are going to bind to texture unit 0.
In the OpenGL side of the application, in the setup step, we need to retrieve the location of the uniform texUnit. As far as OpenGL is concerned texUnit is an integer. So, assuming that variable p stores the name of the GLSL program, the code to retrieve the location is as follows
GLint texUnitLoc = glGetUniformLocation(p, "texUnit");
If the texture unit to be supplied to the shader is always the same we can set it up in the setup of the application. Otherwise we will have to set it as often as the texture unit changes. To setup the variable texUnit to texture unit 0 we can write:
glProgramUniform1i(p, texUnitLoc , 0);
Rendering implies binding the texture to a texture unit. So, if we assume that textureID is the texture name (as created by glGenTextures) and that the texture is 2D, we could write:
glActiveTexture(GL_TEXTURE0);
glBindTexture(GL_TEXTURE_2D, textureID);
Afterwards we bind the VAOs and call a glDraw* command.
GLSL
Now, let’s move to the GLSL side. First we must declare the variable texUnit. This variable is declared as a sampler*. Samplers are opaque types, i.e. they can not be accessed as a regular variable, and their usage is restricted to appropriate functions. Samplers allow access to textures defined in the OpenGL side of the application, through functions that will retrieve values from the texture data. Each texture type has an appropriate sampler type, for instance, for texture target GL_TEXTURE_2D the sampler type is sampler2D.
To access a texture we need two elements: the texture unit, and the texture coordinates. There are several functions to access texture data. Some of them are queries, others provide the texture data. Let’s start with some queries.
A generic shader can work with textures that may vary in size. Size information (width and height) can be provided to the shader through uniform variables. Another option is to use textureSize function. This function returns the size of the texture in the x, y, and z components, and w is the index when using texture arrays or cubemaps. This function can also take a mipmap level, in which case all the above info is relative to the requested mipmap level.
Texture mipmap level count can be queried with textureQueryLevels. This function will return the number of accessible mipmap levels in a texture (available from OpenGL 4.3).
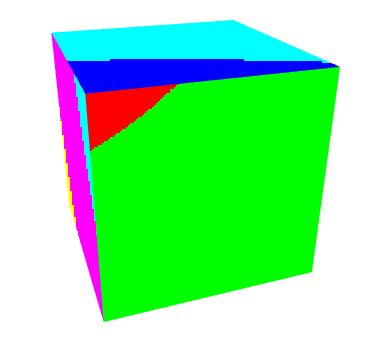
The mipmap level, or combination of mipmap levels, being used for a particular fragment can be obtained with textureQueryLod. This function returns a vec2 where the x component describes which levels are being used and in which proportion. For instance x = 3.25 then level 3 would contribute with 75% and level 4 with 25%.
We can see this in action. Consider the following code:
#version 420

uniform sampler2D texUnit;
out vec4 outputF;

void main()
{
	vec2 res = textureQueryLod(texUnit, VertexIn.texCoord.xy);

	if (res.x == 0)
		outputF = vec4(1.0, 0.0, 0.0, 0.0);
	else if (res.x < 1)
		outputF = vec4(0.0, 1.0, 0.0, 0.0);
	else if (res.x < 2)
		outputF = vec4(0.0, 0.0, 1.0, 0.0);
	else if (res.x < 3)
		outputF = vec4(0.0, 1.0, 1.0, 0.0);
	else if (res.x < 4)
		outputF = vec4(1.0, 0.0, 1.0, 0.0);
	else if (res.x < 5)
		outputF = vec4(1.0, 1.0, 0.0, 0.0);
	else if (res.x < 6)
		outputF = vec4(0.5, 1.0, 0.0, 0.0);
	else if (res.x < 7)
		outputF = vec4(0.0, 1.0, 0.5, 0.0);
}
The result could be something like the following image:
Retrieving the texture data
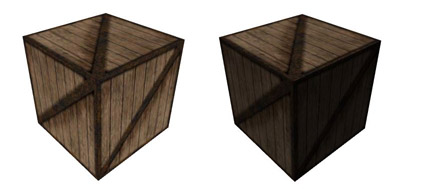
To actually retrieve the texture data to color our models we can use two functions: texture and texelFetch. The first one takes texture coordinates between 0 and 1, or the fractional part if texture coordinates are repeated. These are relative texture coordinates. Fetching, on the other hand, takes integer texture coordinates, as the line and column of the pixel. No linear filtering is performed, a single texel is retrieved.
Once we get the texture data we can use as our final color, or modulate it with the reflected intensity computed in here. The image below shows the results for the above scenarios (left:replace; right:modulate).
Texture color can also be combined with the pixel’s material. For instance, the directional light shaders (see here) with texturing could be written as follows:
Vertex Shader: texture coordinates have been added as attributes. The vertex shader is just a pass-through.
#version 330

layout (std140) uniform Matrices {
	mat4 m_pvm;
	mat4 m_viewModel;
	mat3 m_normal;
};

layout (std140) uniform Lights {
	vec3 l_dir;	   // camera space
};

in vec4 position;	// local space
in vec3 normal;		// local space
in vec2 texCoord;

// the data to be sent to the fragment shader
out Data {
	vec3 normal;
	vec4 eye;
	vec2 texCoord;
} DataOut;

void main () {

	DataOut.normal = normalize(m_normal * normal);
	DataOut.eye = -(m_viewModel * position);
	DataOut.texCoord = texCoord;

	gl_Position = m_pvm * position;
}
Fragment Shader: A sampler has been added. Texture coordinates are used to retrieve a color with function texture
#version 330

layout (std140) uniform Material {
	vec4 diffuse;
	vec4 ambient;
	vec4 specular;
	float shininess;
};

layout (std140) uniform Lights {
	vec3 l_dir;	   // camera space
};

in Data {
	vec3 normal;
	vec4 eye;
	vec2 texCoord;
} DataIn;

uniform sampler2D texUnit;

out vec4 colorOut;

void main() {

	// set the specular term to black
	vec4 spec = vec4(0.0);

	// normalize both input vectors
	vec3 n = normalize(DataIn.normal);
	vec3 e = normalize(vec3(DataIn.eye));

	float intensity = max(dot(n,l_dir), 0.0);

	// if the vertex is lit compute the specular color
	if (intensity > 0.0) {
		// compute the half vector
		vec3 h = normalize(l_dir + e);
		// compute the specular term into spec
		float intSpec = max(dot(h,n), 0.0);
		spec = specular * pow(intSpec,shininess);
	}
	vec4 texColor = texture(texUnit, DataIn.texCoord);
	vec4 diffColor = intensity *  diffuse * texColor;
	vec4 ambColor = ambient * texColor;

	colorOut = max(diffColor + spec, ambColor);
}
Note that only the diffuse and ambient colors are combined with the texture. The specular effect is not affected by the texture.
Source code and a Visual Studio 2010 solution can be found in here. Note: you must get DevIL to run this demo.
NOTE
If samplers are aggregated into arrays, then the samplers can only be indexed with a dynamically uniform integral expression. This means that the index must be constant in all instances of the running shader.
The code below should be OK because we are always using the same index:
uniform int anIndex;
uniform sampler2D myTexture[3];

in vec2 texCoord;

void main () {

    ...
    color = texture(myTexture[anIndex], texCoord);
    ...
}
An example of how to get into trouble is now presented. Suppose we want to select one texture if the y screen coordinate is below a certain threshold, and a different texture when it is above.
uniform int anIndex;
uniform sampler2D myTexture[3];

in vec2 texCoord;

void main () {

    ...
    if (gl_FragCoord.y > 100.0)
        index = 0;
    else
        index = 1;

    color = texture(myTexture[index], texCoord);
    ...
}
| Prev: Texture Coordinates | Next: Index |
Fantastic website. A lot of useful information here. I’m sending it to a few pals ans also sharing in delicious. And naturally, thank you in your sweat! gaeefaddadde