


|
Terrain Tutorial Index
A TGA Library
Height Maps
Lighting
Artificial Terrain Generation
Mid Point Displacement
Smoothing |
| [Previous: Mid Point Displacement] | [Next: Particle Deposition] |
Terrain Tutorial
Mid Point Displacement Algorithm
The Mid Point Displacement algorithm is very simple. As opposed to the previous algorithms, the grid size of the terrain, i.e. the number of grid points increases per iteration.
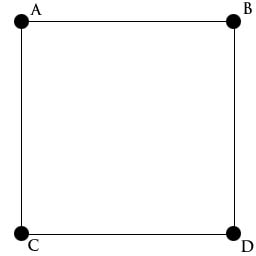
| Initially the algorithm starts with a 2x2 grid. The heights of the four corners can be set to zero, a random value, or just some preset value. |
|
|
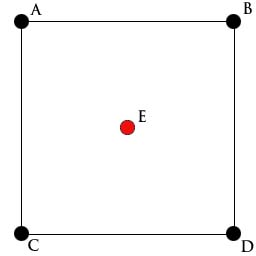
The first step is to find a height for the center of the terrain. This value is computed as the average height of the four corners plus a random displacement.
This step is know as the diamond step (if you render the terrain now you'll see four diamond shapes).
|
|
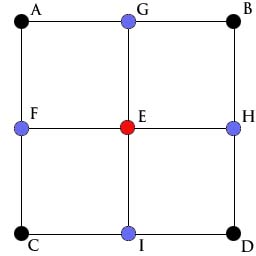
G = (A + B + E + E) / 4 + RAND(d) H = (B + D + E + E) / 4 + RAND(d) I = (C + D + E + E) / 4 + RANS(d)
|
|
Terrain wrapping is not a common feature since it provides noticeable repetition, and thats the last thing you want. Nevertheless it you're using this algorithm just as a step towards the final terrain, i.e. to provide just a little bit of irregularity to your otherwise ready terrain, then wrapping is a good option.
In my humble oppinion, if wrapping is not going to be used in practice, then there is no advantage in having such a feature. In fact a terrain that wraps must share topological features between opposite borders. For instance if there is an elevation on the right side, then there must be a similar elevation in the left side as well to allow wrapping. If wrapping is not going to be used then this is an undesired feature. In this case I suggest that you don't wrap the terrain. For instance to compute F use
Basically, for the points on the border use just the three connecting points to compute the average.
The first iteration is complete. Now it is necessary to multiply the value of d as shown
d *= pow(2,-r)
where r is the roughness constant presented in the previous section.
|
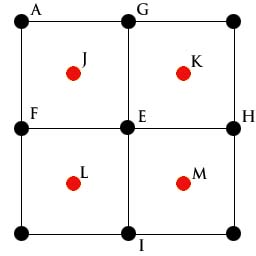
Now we have four squares. The process is repeated for each square: first for all squares apply the diamond step, i.e. compute a height for eacg center (red points). For instance in the figure bellow,
K = (G + B + E + H)/4 + RAND(d) L = (F + E + C + I)/4 + RAND(d) M = (E + H + I + D)/4 + RAND(d) |
|
|
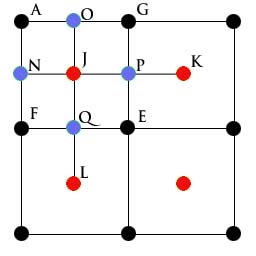
After applying the diamond step to all squares, it is time to apply the square step. In the figure on the left, the points for the first square are the blue points. The wrapping version is
O = (L + A + G + J)/4 + RAND(d) P = (J + G + K + E)/4 + RAND(d) Q = (F + J + E + L)/4 + RAND(d) In the non wrapping version the computation of N and O is different:
O = (A + G + J)/3 + RAND(d) |
| [Previous: Mid Point Displacement] | [Next: Particle Deposition] |